Exposure is at the core of photography and refers to the amount of light that reaches the camera sensor or film during image capture. This concept is essential to creating an image with correct brightness, as exposure directly affects the look of the photo—it can appear brighter (overexposed) or darker (underexposed), depending on how the light is controlled.
Proper adjustment of aperture, shutter speed, and ISO is crucial to achieve a perfectly exposed photo. These three elements form what is known as the exposure triangle, and the photographer manipulates them to reach the ideal exposure, taking into account the desired effect in the image, such as background blur discussed in the previous article or motion capture.
Let’s briefly review what each element of the exposure triangle is and how their numerical values appear so we can move forward:
Aperture: Controls the amount of light entering through the lens, as well as the depth of field (how much of the image is in focus). The numerical value of aperture is represented by f-numbers (f-stops), which indicate the lens opening size: f/1.4, f/2, f/2.8, f/16. These values are inversely proportional to the amount of light entering the camera: the smaller the f-number, the larger the aperture and the more light enters; the larger the f-number, the smaller the aperture and the less light enters.
Each increase in the f-number (e.g., from f/2 to f/2.8) means the lens aperture decreases, reducing the amount of light but increasing depth of field (i.e., more of the image is in focus). The photographer adjusts these values depending on the scene and the desired effect, such as light control and background blur (bokeh).
Shutter speed: Controls how long the sensor or film is exposed to light, impacting the amount of light and the capture of motion in the image. The shutter speed is represented by fractions or whole numbers indicating how long the shutter remains open to allow light to reach the sensor. This value is expressed like: 1/1000 (one-thousandth of a second), 1/500, 1/8 (time increases as the number decreases), 1 (1 second total exposure), 30″ (30 seconds).
When the value is shown as a fraction, like 1/500, it means the shutter is open for one five-hundredth of a second. Whole numbers such as 1″, 2″, or 5″ indicate a longer exposure time of 1 second, 2 seconds, or 5 seconds respectively. The higher the number, the faster the shutter speed, which can freeze motion. The lower the number, the slower the speed, allowing more light or motion effects to be captured.
ISO: Refers to the amplification of the analog light signal reaching the sensor. Increasing the ISO allows for shooting in lower light, but it can also cause unwanted distortions that appear as grain or colored spots in the photo (noise). Typical ISO values start low, like ISO 100 (standard for good lighting), and increase as needed, such as ISO 12800 (and higher for low-light environments).
The numerical values of the exposure triangle interact to form the Exposure Value (EV). The process of managing this interaction is called Metering. And that’s where we go next.
While EV provides a numerical measure that quantifies the amount of light hitting the sensor or film, metering is the process of measuring the amount of light in a scene to determine the correct exposure in photography, as displayed on the light meter.
The light meter, whether built into the camera or external, provides EV values through a visual indicator, such as a scale or bar, helping the photographer compensate exposure in a range from -3 to +3 stops, ensuring the photo is well-exposed — neither too bright nor too dark.
With the light meter reading, the photographer can adjust aperture, shutter speed, and ISO to reach the ideal EV, ensuring the image is properly exposed and key details are preserved.
There are many terms involved, but the conceptual relationships explored in this article will elevate your understanding of photography. So let’s dive in!
Exposure Value (EV) and its relationship with light metering
Exposure Value (EV) is a standardized measurement that summarizes the amount of light in a scene based on the combination of aperture and shutter speed. In essence, EV allows different settings that produce the same amount of light to be objectively compared. For example, an exposure achieved with f/8 and 1/125 second may have the same EV as a combination of f/5.6 and 1/250 second, since both result in the same amount of light reaching the sensor.
Mathematically, EV can be represented by the formula:
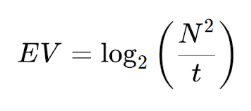
where:
N is the f-number (representing aperture),
t is the exposure time (shutter speed), and
log base 2 is used because exposure values generally double with light quantity, following a binary progression.
Let’s suppose we’re using a lens with an aperture of N = 4 (f/4) and a shutter speed of t = 1/125 seconds:
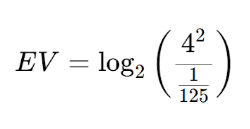
First, we calculate the values inside the fraction:
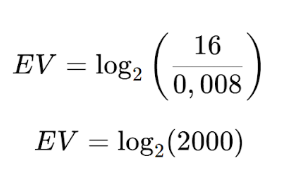
Now, we calculate the logarithm of 2000 in base 2:
EV = log2 (2000) ≈ 10.97
Therefore, the EV for this aperture and shutter speed combination is approximately 10.97.
The value 10.97 indicates the amount of light captured by the camera for that particular setup. If we adjust the aperture or shutter speed, the EV will change, reflecting more or less light in the image. The higher the EV value, the more light is captured.
Note that in terms of EV, incident light is either doubled or halved when doubling or halving the aperture or shutter speed. In other words, each variation of one “stop” in EV corresponds to a doubling or halving of light.
The EV measurement is especially useful for comparing lighting conditions in different scenarios and for planning exposure adjustments without changing the intended visual outcome of the image.
When assessing the scene, the light meter provides a visual indication — whether through a viewfinder, LCD screen, or digital indicators — of the measured EV. In automatic or semi-automatic cameras, the system uses this value to automatically determine the exposure settings, ensuring the image is correctly lit. In manual mode, the photographer can use this information as a reference to adjust the parameters based on their creative intent, even applying exposure compensation to achieve the desired effects.
For example, in a high-contrast scene, the light meter may suggest an EV that results in both overexposed and underexposed areas. In such cases, the photographer may choose to manually adjust the exposure using the triangle, intentionally underexposing or overexposing the image to preserve details in highlights or shadows, respectively.

Photo: Taísa Maar (@taisamaar)
The Zone System by Ansel Adams
Balancing the elements of the exposure triangle — aperture, shutter speed, and ISO sensitivity — is essential for ensuring a well-exposed image. However, achieving this balance goes beyond a simple formula, requiring a deep understanding of the scene and the photographer’s creative intentions. The Zone System offers a practical approach to visualizing and distributing the tonal range of a scene, from the deepest shadows to the brightest highlights.
Developed by Ansel Adams, in collaboration with Fred Archer, in the 1940s, the Zone System emerged during a time of significant change in photographic practice. Back then, precise control over exposure and negative development was crucial for achieving high-quality images. Adams, known for his iconic black-and-white landscapes, sought a technique that would accurately translate the tonal richness of a scene, preserving details in highlights and shadow nuances. The Zone System was born from that pursuit, offering a scientific and practical methodology for light control.
This system divides the tonal scale into 11 zones, numbered from 0 to 10 (or from “Zone 0” to “Zone X”), with each zone representing a specific level of brightness:
Zone 0: Absolute black, no detail.
Zone I: Near black, with subtle contours.
Zone V: Middle gray, considered the neutral tone and reference point for correct exposure.
Zone X (10): Pure white, where details are lost due to overexposure.
The main goal of the Zone System is to allow the photographer to pre-visualize the distribution of light and shadow in the final image. By using the light meter, the photographer determines which zone contains the most important element of the scene (such as the main subject or areas of critical detail), and from that reading, selects the ideal settings to capture the desired tone.
In practice, when metering a scene, the photographer may choose to place a specific element in Zone V, ensuring it is rendered with a middle gray tone that retains detail in both the highlights and the shadows. Then, they can adjust the exposure so that the brighter areas fall into higher zones (such as Zone VII or VIII), and the darker areas into lower zones, depending on the artistic intention.
Although digital photography has evolved, the principles of the Zone System remain relevant. Modern cameras, with histograms and real-time viewing modes, make it easier to interpret Adams’ concepts. Additionally, post-production software offers precise tonal curve adjustments, allowing photographers to replicate the original vision of the system.

While the Exposure Value (EV) provides a quantitative measurement of exposure, the Zone System offers a qualitative way to visualize how light will be distributed in the image. By classifying different areas of a scene into various zones, the photographer can anticipate the tonal outcome and adjust the exposure to preserve important details in both shadows and highlights.
Imagine, for example, a landscape scene with a bright sky and deeply shadowed ground. The light meter may read an EV that, if applied directly, would result in an overexposed sky and shadow areas with no detail. Using the Zone System, the photographer can decide to place the sky in Zone VII and the ground in Zone V, allowing both elements to be captured with the desired tonal values, balancing the light and creating a harmonious image.
In a portrait, the photographer may use the measured EV to set the base exposure but rely on the Zone System to ensure that skin tones appear natural and have the appropriate level of detail, avoiding both blown-out highlights and lost shadow information.
The Zone System not only optimizes technical exposure but also expands creative possibilities, allowing the photographer to manipulate depth of field, motion freeze, and other artistic aspects. This method goes beyond technical correction and enables refined control over contrast, resulting in visually rich and expressive compositions.
Understanding EV and the light meter is essential for those who wish to explore the full potential of photography, as it allows photographers to combine technique and creativity to capture memorable and high-quality images. This synergy between technical precision and artistic expression is especially valuable in challenging lighting conditions, where an accurate meter reading and careful EV application can be the key to creating impactful images.
Dividing tones into zones allows the photographer to plan in advance how different areas of the scene will be rendered in the final image. For example, they may decide whether a bright area should be preserved with detail by keeping it in higher zones (like VII or VIII), or whether they want to explore deep shadows to increase contrast, placing those areas in lower zones.
In analog photography, the photographer used a spot meter to identify the zone corresponding to a key element in the scene and, from there, adjusted the exposure — such as aperture and shutter speed — to ensure that zone was correctly exposed. In digital photography, although the development process is replaced by post-production, the principles of the Zone System are still applied through fine adjustments to tonal curves using editing software.
Ultimately, Ansel Adams’ Zone System is a philosophy that combines technical mastery of exposure with artistic expression. By dividing the tonal scale into well-defined zones, the system allows the photographer to make conscious decisions about the rendering of each scene detail, precisely controlling exposure and contrast. Even with the advancements in digital photography, the concepts of the Zone System continue to inspire photographers to transform light into compelling visual narratives, creating images that are both technically accurate and artistically expressive.
We hope this relationship between EV, light meter, and the Zone System has brought you, the reader, a new perspective on Exposure in Photography!
See you next time!
This post is also available in: Português (Portuguese (Brazil)) Español (Spanish)