Now it’s time to go a little deeper into the topic and explore magnetic declination. The term magnetic declination refers to the angle between True North and Magnetic North, just as certain angles have special names—for example, a right angle always measures 90º.
The three types of north
There are three types of north represented on topographic maps: (1) True North, (2) Magnetic North, and (3) Grid North (Figure 1 below).
True North is a human convention, defined as the point where all meridians converge—essentially, the “axis” of the Earth’s rotation at the North Pole. Magnetic North, in turn, represents the alignment of the Earth’s magnetic forces (suggested reading: Earth Magnetism – Geological Survey of Brazil). Its position changes over the years. In 1831, James Clark Ross was the first to record its location, just north of the Arctic Circle, and in 1904 the Norwegian explorer Roald Amundsen noted that it had shifted position. Finally, there is Grid North—the UTM north discussed in my previous article.
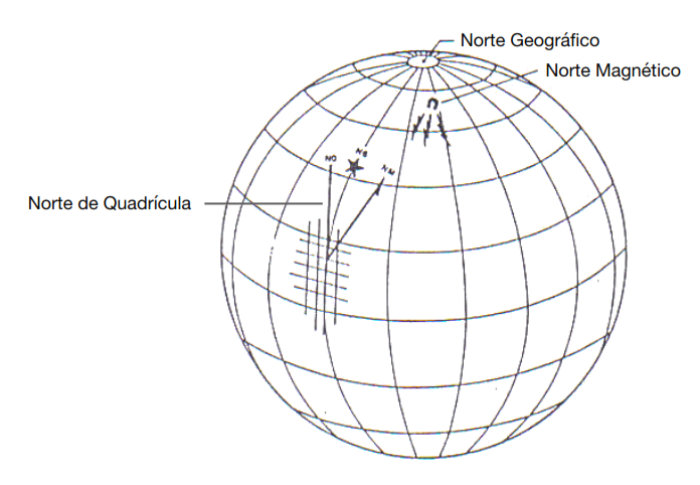
Figure 1: the three types of north found on topographic maps. GN = Grid North, TN = True North, and MN = Magnetic North (Santos, 1990).
Therefore, it’s important to know the local declination when you want to align your compass with the map. But don’t worry—it’s not as complicated as it sounds. To calculate local declination, simply look at the declination diagram in the map’s legend, as shown in the figure below (Figure 2).
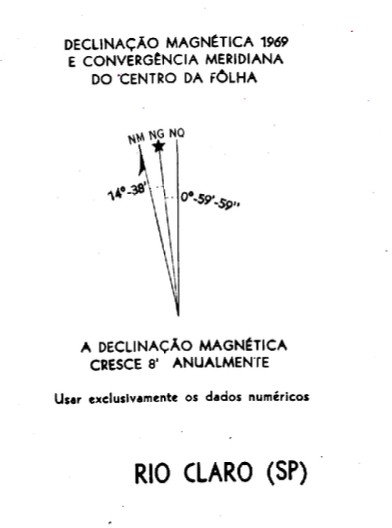
Figure 2: Magnetic declination represented on the Rio Claro map, IBGE 1969
Calculating magnetic declination
In that diagram, you’ll find the map’s declination at the time it was produced, its annual variation, and whether the declination shifts east or west. The legend also indicates the last year the declination was calculated. To update it, multiply the map’s age by its annual variation and add that value to the original declination.
Let’s use the Rio Claro map (SHEET SF-23-M-I-4), produced by IBGE in 1969, as an example. That year, its declination was 14°38’—fourteen degrees and thirty-eight minutes—west, with an annual variation of 8’ (eight minutes).
Therefore, in 2024, 55 years have passed since the last known declination, resulting in a variation of 440’ (8’ x 55). However, since every degree equals 60 minutes, divide 440 by 60 to convert it into degrees: 7.3333º, or approximately 7°20’ (7º x 60 = 420’, with 20’ remaining). Add this to the original declination from 1969: 14°38’ + 7°20’ = 21°58’. (If the total minutes exceed 60, add 1º and keep the remainder as minutes.) Because the declination moves westward, we must subtract 21°58’ from 0º/360º on the map. Thus, the north direction will be represented by an angle of 338°02’.
Remember these symbols: º = degree ‘ = minute “ = second
In some cases, you’ll also find in the declination diagram the angle between True North and Grid North. This angle arises from the attempt to project the Earth onto a flat surface, as explained in the article on UTM – Universal Transverse Mercator. Notice in Figure 1 that Grid North follows a straight north-south line that deviates slightly from True North. Fortunately, since this angle is numerically small, it’s usually ignored.
Using magnetic declination
There are three ways to use magnetic declination on a map:
1. Drawing new north lines directly on the map.
2. Adjusting the compass (available only on some models).
3. Calculating in the field by adding or subtracting the declination relative to True North.
From a practical standpoint, the easiest way is to draw the “new” north on the map. Calculate the declination using the legend’s data, as described above, and with your compass, find that angle relative to the map’s grid lines. Then follow these steps:
1. Set your compass to the calculated declination based on the legend’s data.
2. Place the compass on the map, aligning the north line on the compass dial with one of the map’s grid lines. Ignore the needle for this step.
3. Use a pen to draw the new north lines with the adjusted declination (Figure 3).
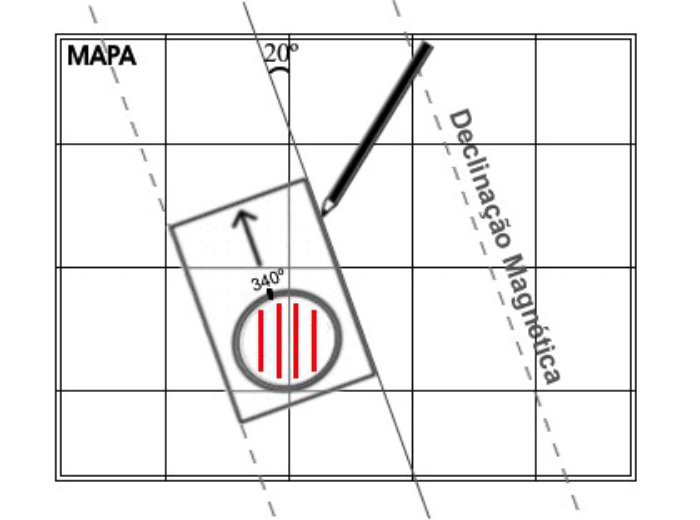
Figure 3: drawing magnetic declination on a topographic map. Antônio Calvo and Paul Colas Rosas, 2007
Pay attention to your compass details, as most models display numerical graduations in increments of two degrees. To simplify fieldwork, you can round the calculated angles and declination values. In the example above, the declination changes from 21º58’ to 22º and from 338º02’ to 338º.
Now gather all this information—and start practicing! Happy adventures.
This post is also available in: Português (Portuguese (Brazil)) Español (Spanish)